Edited by Caro1970 at 2024-6-8 09:04
SEWING INSTRUCTION You will need - Fabric of your choice
- Invisible zipper
- Fusible interfacing (medium weight)
- Scissors, pencil or fabric marker, ruler, pins
- Sewing machine/Serger or needle and thread
- Printed pattern
What fabric can be used for this project? This design is made for woven fabric. You can use almost any kind of woven non stretchy or slightly stretchy fabric. How much fabric do you need for this piece of garment? To be precise, you may need to check how much fabric you need before buying. It will depend on the selected pattern size, the width, and design of the fabric you plan to use. Just to be sure, print all the paper patterns and lay them out at the width of fabric you plan to use (usually from 90 to 150 centimeters or 35 to 60 inches). Measure how much fabric you will need. Don’t forget to account for pieces that need to be cut multiple times and pieces that are cut on the fold. For this pattern, you will need to use a sewing machine that has the function to sew stretch fabric (zig zag stitch for example), or use a serger which is designed to sew stretch fabric nicely. Cutting instruction: After printing out and taping all the pattern pages together, you will get something similar to this image: 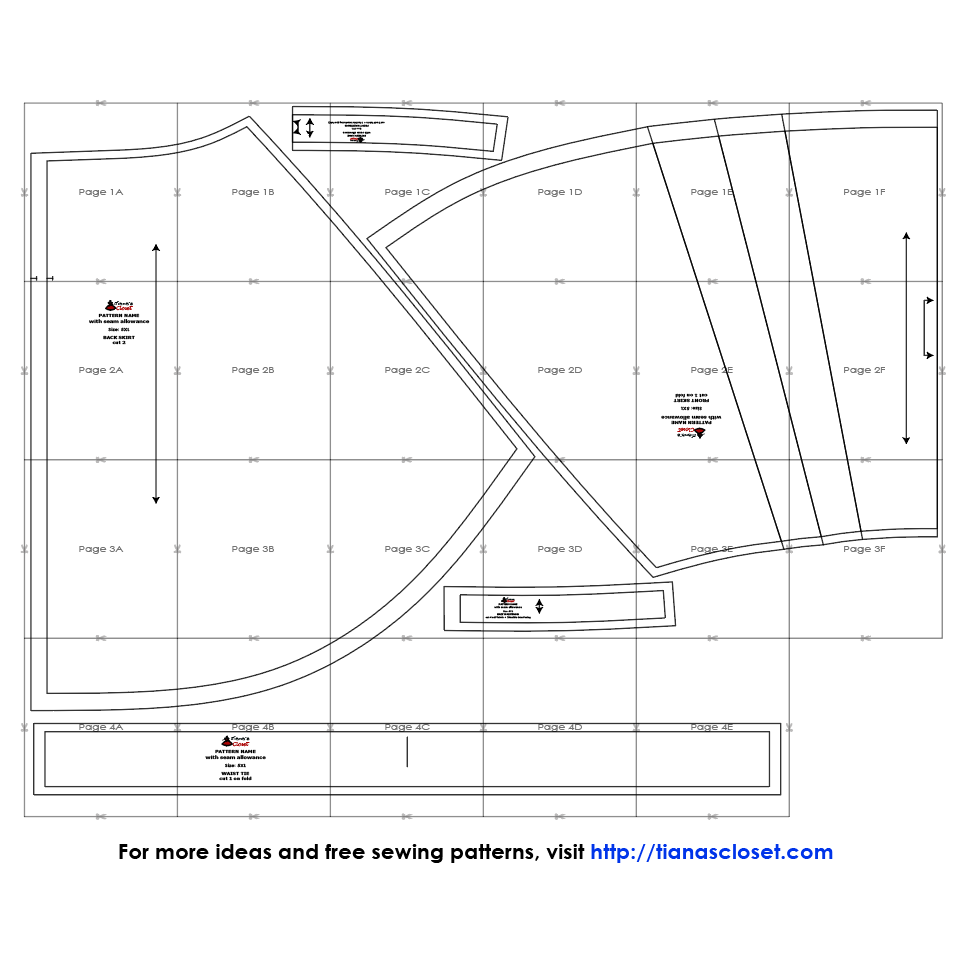
You will see that there are 2 sets of lines on each pattern size. The inner lines are sewing line (and you sew along these lines), and the outer lines are cutting lines (you cut the fabric along these lines, remember the folding lines where you have to fold the fabric before cutting). The distance between sewing line and cutting line is seam allowance, and it varies from point to point. For example, the side seam allowance is about 1/2 inch (1.2cm), and seam allowance at hemline is 1 inch (2.5cm). This is the reason why I do not remove the sewing lines from the pattern. Please use it as a guide to know how much seam allowance you need to give at each seam. Fabric will be cut into following pieces: - Front: cut 1 pc on the fold
- Back: cut 2 pcs
- Front Waistband: cut 2 pcs self fabric + 1 pc fusible interfacing (on the fold)
- Back Waistband: cut 4 pcs self fabric + 2 pcs fusible interfacing
- Waist Tie: cut 1 pc on the fold
Make sure to mark all notches and other design features such as darts, pleats etc. from the pattern pieces onto your fabric. When sewing the garment, pay attention to notches, they must match up. Sewing instruction: 1. Serge/zig zag stitch the raw edge to prevent fabric from unraveling. 2. Apply fusible interfacing on Front Waistband and Back Waistband. 3. Fold and press the front pleat, align two “legs” of the pleat and press the center of the pleat toward the side (two pleats mirror each other). Sew a basting at the upper edge of the Front Skirt piece to secure the pleats in place. 4. Place two Back Skirt pieces right side facing, sew from the lower end toward the notch at the middle of the side seam. 5. Place Front Skirt and Back Skirt right side facing, matching the side. Pin and sew the side seams to get the main garment. 6. Place Front Waistband and Back Waistband right side facing, sew the side seams. You will get 2 pieces of waistband. 7. Place the pair of waistband right side facing, matching the center and side seam, sew the top side of the waistband. Stay stitch the seam allowance toward the flap which will be on the inside of the skirt. 8. Place the outside flap of the waistband and the main garment right side facing, matching the center notches and side seams. Pin and sew to join the waistband to the main garment. 9. Attach invisible zipper to the back of the skirt. 10. Fold the other flap of the waistband inside, hand sew or use stitch-in-the-ditch technique to finish the waistband of the skirt. 11. Hem the skirt. 12. Fold the Waist Tie in half along the longer edge. Sew around and leave an opening of 2 inches then turn it inside out from the opening. Press and hand sew to close the opening to get the tie.
| 


 upgrade card
 set top card
 replt card
 Noisy card
 Colorizer
 Jack
Jack
 chekccard