|
|
Edited by Bleu at 2016-8-25 19:30

The instructions will work for both top-down and bottom-up sweaters, but the wedge will either be smaller on top or on the bottom depending on which direction you’re knitting. This won’t impact how the short rows work
 Short rows knit top-down Short rows knit top-down  Short rows knit bottom-up Short rows knit bottom-up
How many short rows should I do?You may have heard of the convention of knitting a certain number of short rows depending on your cup size. I don’t like that approach, and I find that it does not work for really large busts. I recommend a different approach.
Take a tape measure and write down two measurements – full bust length (#3 below) and outer bust length (#4).
The difference in these two measurements is a good approximation of the height of short rows you need to do. If your top has a lot of positive ease you may need fewer short rows than you measured. If your top has a lot of negative ease you may need to do more.
Note: I’m using inches but metric units will work exactly the same way.
Let’s take a real world example. Say you’re knitting a sweater:
- Gauge: 20 sts and 24 rows over 4 in / 10 cm
- Outer Bust is 13 inches
- Full Bust is 16 inches.
- Front width is 19 inches
Calculate the additional length neededAdditional length is Full Bust – Outer Bust. In our example it is 16 – 13 = 3 inches
This means you need to add 3 inches of length to the front of your garment to make up for the length that is taken up by the fullest part of your bust.
Determine how many rows make up the additional lengthStep 1: Determine how many short rows you need6 rows per inch x 3 inches = 18 rows.
Perfect! 18 is an even number. If our number wasn’t even we would have had to round up or down to make it even.
Step 2: Determine how many stitches you have to work with for the short rowsThe short rows should start about 1 inch outside of the apex of your breast. This makes for a smooth transition and avoids a point right at the point of the breast (yeah, not so pretty).
Measure across the bust from apex to apex. Add 2 inches to it.
If the measurement from apex to apex is 8 inches, 8 + 2 = 10 inches.
Then, take this measurement and subtract it from the width of the front:
19 – 10 = 9 inches
Now, halve that number because half of it is on each side of the apex measurements.
9 / 2 = 4 ½ inches
4 ½ inches in number of stitches for our gauge is
4 ½ inches * 5 stitches per inch = 22 ½ stitches
We’ll decide in the next set of instructions if we should round up or down.
Step 3: Determine placement of the short rowsI recommend starting the short rows a half an inch in on each side of the body — this is just to keep the sides clean.
So, if we’re going to be working a half inch in on each side, that’s
4.5 stitches per inch * ½ inch = 2 ¼ stitches.
We’ll remove this from the number of stitches calculated in Step 2.
22 ½ – 2 ¼ = 20 ¼
20 ¼ is close to 20 so let’s round down to 20.
Step 4: Short row rateWe’ll be giving some space between each wrap to avoid a discernible line on the sides of your bust. In the below illustration we have 8 wraps (4 on each side) for a total of 8 short rows.

n our example we’ll be doing 18 short rows over 20 sts. To make the math easy, let’s make it 18 short rows over 18 sts.
Note – we can’t change the number of rows (the 18 number) but we can nudge the 20 number a bit and still be OK. Designers do this all the time when they’re doing things like calculating decrease rate for sleeves or waist shaping and the like.
So, we’re going to do 18 short rows over 18 stitches. Since short rows are in pairs, this means we’ll be doing 9 short rows on each side (in the diagram above that would mean 9 black dots on each side).
18 stitches / 9 short rows = 2 stitches. This means we’ll be wrapping and turning every 2 stitches – or every other stitch.
In Pattern-easeHere’s how I would write out these instructions:
Note: These instructions work for sweaters knit in the round and flat. Regardless of which method your sweater is knit, short rows are knit flat. This means if your in the round gauge is different from your knitted flat gauge that you’ll have to take this into account when inserting short rows into an in the round sweater.
Begin Short Rows.
Row 1 (RS): Knit until there are 3* sts rem, w&t
Row 2: Purl until there are 3* sts rem, w&t.
Row 3: Knit until there are 5** sts rem, w&t
Row 4: Purl until there are 5** sts rem, w&t
Cont in this manner for a total of 18 rows – 9 wrapped sts on each side.
If you’re knitting the sweater in the round:
Next Row: Knit across entire row, picking up and working wraps as you come to them.
If you’re knitting the sweater flat:
Next Row: Work across all sts on the row, picking up working the wraps on the right hand side of the sweater.
Next Row: Work across all sts (this will be the first full row you’ll work) picking up and working the wraps on the left hand side of the sweater.
* I calculated the 3 from Step 3 where we determined that the short rows would be placed 2 ¼ stitches in from the edge. I rounded 2 ¼ down to 2. So, the pattern instructs you to work until 3 sts rem and then wrap that next st. The first wrap is placed 2 sts in from the edge.
** I calculated the 5 by taking the 3 in Row 1 and adding 2 to it from Step 4 (Short row rate). This spaces each wrap 2 sts apart.
In action
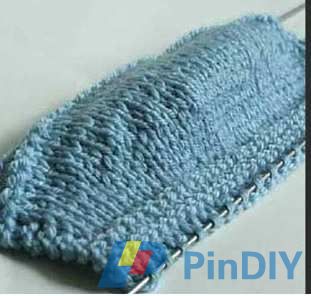
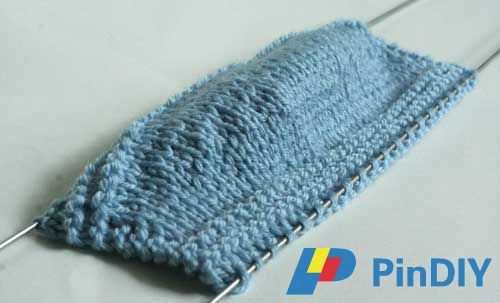
I knit up a small sample to show you what short rows do

The added length translates to a pouch in the sweater when both the top and bottom edges are held flat. You’ll also note that it’s not immediately obvious that there are short rows there. This is because we spaced them apart (Step 4). By spacing the short rows apart you create less of a discernible line in your knitting, making it harder to see. This is similar to spreading decreases out versus stacking them on top of each other
i hope you found this helpfull and informative
thank you
|
Rate
-
View Rating Log
When someone visits this page from a link you share, you will be rewarded
|